[Spring] Spring MVC + 실습
1. MVC 개요
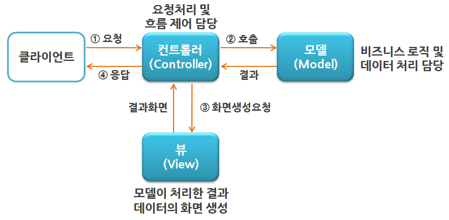
- MVC(Model-View-Controller) : Business와 Presentation을 분리해 효율적인 애플리케이션 개발을 위한 소프트웨어 아키텍처 (링크)
- Controller : 사용자의 요청과 Model과 View 사이에서 상호 작용을 처리하는 컴포넌트
- Model : 애플리케이션의 Business 처리 및 데이터 처리를 위한 컴포넌트
- View는 모델이 처리한 결과를 사용자에게 출력할 화면을 처리하는 컴포넌트
2. Spring MVC
- Spring MVC는 3-tier 방식으로 구성
- 독립적으로 각 계층별 역할을 구분해 설계하기때문에 유지보수와 확장성 확보

3. Front Controller
- 클라이언트가 보낸 요청을 받아서 공통적인 작업을 먼저 수행
- 적절한 세부 Controller에게 작업을 위임
- 각각의 애플리케이션 Controller는 클라이언트에게 보낼 View를 선택해서 최종 결과를 생성
- Spring은 Dispatcher Servlet을 Front Controller로 사용

4. Spring MVC 동작방식과 구성요소

- DispatcherServlet = 프론트컨트롤러
- ViewResolver에서 받아서 View를 출력하는데 이때 6번의 데이터를 사용
- Spring MVC : HandlerMapping, DispatcherServlet, ViewResolver 설정 작업 필요(application.xml)
5. Spring MVC 주요 Annotation

- @Component 어노테이션이 Spring MVC에서는 세분화되는데, 이게 @Controller, @Service, @Repository
- @RequestMapping도 세분화되는데, @GetMapping과 @PostMapping으로 더 간결하게 명시 가능
<< Spring MVC 설정하기 >>
1) Spring 프로젝트 생성

2) 라이브러리 추가 :: pom.xml
- Web MVC (https://mvnrepository.com/artifact/org.springframework/spring-webmvc/5.3.30)
- JSTL (https://mvnrepository.com/artifact/javax.servlet/jstl/1.2)
<dependencies> 안에 넣기

3) View 폴더 생성
src - main - webapp - WEB-INF - views 폴더 생성

4) DispatcherServlet 설정 :: web.xml
https://docs.spring.io/spring-framework/docs/5.3.30/reference/html/web.html#mvc-servlet
Web on Servlet Stack
This part of the reference documentation covers support for Servlet stack, WebSocket messaging that includes raw WebSocket interactions, WebSocket emulation through SockJS, and publish-subscribe messaging through STOMP as a sub-protocol over WebSocket. 4.1
docs.spring.io


5) ViewResolver 설정 :: application.xml
https://docs.spring.io/spring-framework/docs/5.3.30/reference/html/web.html#mvc-view-jsp-resolver
Web on Servlet Stack
This part of the reference documentation covers support for Servlet stack, WebSocket messaging that includes raw WebSocket interactions, WebSocket emulation through SockJS, and publish-subscribe messaging through STOMP as a sub-protocol over WebSocket. 4.1
docs.spring.io


6) Spring Web MVC 어노테이션을 위한 설정


7. 인코딩 설정 :: web.xml
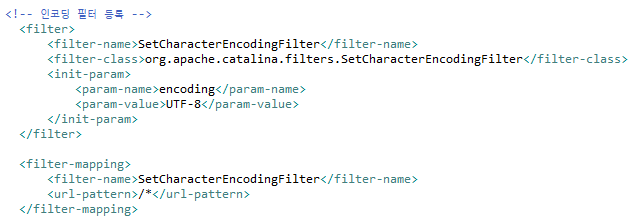
모든 파일에 대하여 설정해줌
[실습1] 기본 MVC 실습

JSP에서 컨트롤러는 extends 상속받아서 했었는데 Spring에서는 ㄴㄴ
컴포넌트 선언해주면 된다. 근데 컨트롤러니까 @Controller !

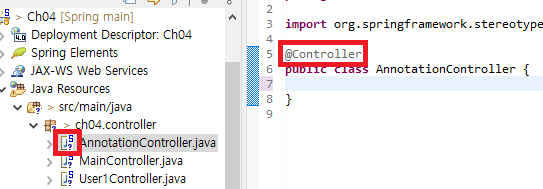
선언해주면 이렇게 마크가 생긴다.

@RequestMapping : 요청주소를 맵핑
메서드 이름, 맵핑주소, 리턴값 템플릿 맞추기 (출력하려는 View 페이지 이름) (암묵적 규칙)
Spring에서는 url 확장명 작성할 필요X
저렇게 간단하지만 ViewResolver가 온전한 경로를 만들어서 반환

---

index 페이지는 메인페이지기때문에 주소맵핑을 메인페이지와 명시적인 페이지 둘 다 해준 것
--------
※ Spring MVC 리다이렉트 vs 포워드 차이

각각 사용법은 위와 같음
근데 이제 리다이렉트는 그 주소로 이동하지만, 포워드는 주소고정이다.


<%@ page contentType="text/html; charset=UTF-8" pageEncoding="UTF-8"%>
<!DOCTYPE html>
<html>
	<head>
		<meta charset="UTF-8">
		<title>index</title>
	</head>
	<body>
		<h3>Ch04.Spring MVC 실습</h3>

		<h4>MVC 기본</h4>
		<a href="/Ch04/hello">hello</a>
		<a href="/Ch04/welcome">welcome</a>
		<a href="/Ch04/greeting">greeting</a>
		<a href="/Ch04/redirect">리다이렉트</a>
		<a href="/Ch04/forward">포워드</a>
	</body>
</html><%@ page contentType="text/html; charset=UTF-8" pageEncoding="UTF-8"%>
<!DOCTYPE html>
<html>
<head>
<meta charset="UTF-8">
<title>hello</title>
</head>
<body>
<h3>Hello</h3>
<a href="/Ch04/index">index</a>
<a href="/Ch04/hello">hello</a>
<a href="/Ch04/welcome">welcome</a>
<a href="/Ch04/greeting">greeting</a>
</body>
</html><%@ page contentType="text/html; charset=UTF-8" pageEncoding="UTF-8"%>
<!DOCTYPE html>
<html>
<head>
<meta charset="UTF-8">
<title>welcome</title>
</head>
<body>
<h3>Welcome</h3>
<a href="/Ch04/index">index</a>
<a href="/Ch04/hello">hello</a>
<a href="/Ch04/welcome">welcome</a>
<a href="/Ch04/greeting">greeting</a>
</body>
</html><%@ page contentType="text/html; charset=UTF-8" pageEncoding="UTF-8"%>
<!DOCTYPE html>
<html>
<head>
<meta charset="UTF-8">
<title>greeting</title>
</head>
<body>
<h3>Greeting</h3>
<a href="/Ch04/index">index</a>
<a href="/Ch04/hello">hello</a>
<a href="/Ch04/welcome">welcome</a>
<a href="/Ch04/greeting">greeting</a>
</body>
</html>package ch04.controller;
import org.springframework.stereotype.Controller;
import org.springframework.web.bind.annotation.GetMapping;
import org.springframework.web.bind.annotation.RequestMapping;
import org.springframework.web.bind.annotation.RequestMethod;
@Controller
public class MainController {
@RequestMapping(value= {"/", "/index"}, method=RequestMethod.GET)
public String index() {
return "index";
}
@RequestMapping(value="/hello", method=RequestMethod.GET)
public String hello() {
return "hello";
}
@GetMapping("/welcome")
public String welcome() {
return "welcome";
}
@GetMapping("/greeting")
public String greeting() {
return "greeting";
}
@GetMapping("/redirect")
public String redirect() {
return "redirect:/annotation/param";
}
@GetMapping("/forward")
public String forward() {
return "forward:/annotation/model";
}
}
[실습2] Annotation 실습


post 방식으로 폼을 전송했으니 post방식으로 받음
혹은 더 간결하게 더 세분화된 @PostMapping 사용

-------
JSP에서는 req.getParameter()를 이용해서 데이터를 수신하고, request scope를 이용하고 참조하여 데이터를 뷰에 출력했었는데,
Spring에서는 @RequestParam("")으로 데이터를 가져와 Model 클래스를 통해서 addAttribute("키", 값)해주어 뷰에 출력한다.


+) @RequestParam() 생략 가능
+) 매개변수 순서 상관X
==================== @ModelAttribute

근데 이렇게 많은 변수가 매개변수로 들어오면 별로.. dto로 한번에 전송하고 싶음.
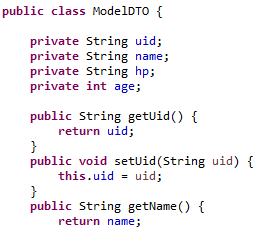
package ch04.dto;

public class ModelDTO {

	private String uid;
	private String name;
	private String hp;
	private int age;

	public String getUid() {
		return uid;
	}
	public void setUid(String uid) {
		this.uid = uid;
	}
	public String getName() {
		return name;
	}
	public void setName(String name) {
		this.name = name;
	}
	public String getHp() {
		return hp;
	}
	public void setHp(String hp) {
		this.hp = hp;
	}
	public int getAge() {
		return age;
	}
	public void setAge(int age) {
		this.age = age;
	}
}
DTO를 생성해주고, DTO로 수신할 때 사용하는 어노테이션이 @ModelAttribute
각 계층별로 공유하는 데이터가 DTO

dto를 받아와서 모델 클래스를 이용해 addAttribute해도 되지만, 어노테이션에 이 기능까지 포함되어있어서 그럴 필요가 없다.

@ModelAttribute 만으로 이미 모델참조가 끝난 것이고 결과 뷰에 바로 출력하면된다.
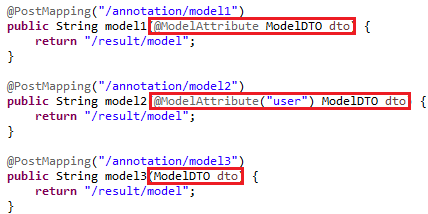
셋 다 동일.
@ModelAttribute("user") : 참조모델의 이름
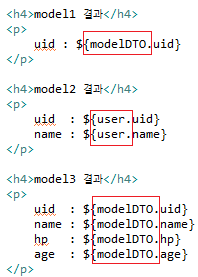
결과 뷰에서 출력하기
<%@ page contentType="text/html; charset=UTF-8" pageEncoding="UTF-8"%>
<!DOCTYPE html>
<html>
	<head>
		<meta charset="UTF-8">
		<title>index</title>
	</head>
	<body>
		<h3>Ch04.Spring MVC 실습</h3>

		<h4>Annotation 실습</h4>
		<a href="/Ch04/annotation/param">@RequestParam 실습</a>
		<a href="/Ch04/annotation/model">@ModelAttribute 실습</a>
	</body>
</html><%@ page contentType="text/html; charset=UTF-8" pageEncoding="UTF-8"%>
<!DOCTYPE html>
<html>
<head>
<meta charset="UTF-8">
<title>annotation::param</title>
</head>
<body>
<h3>@requestParam 어노테이션 실습</h3>
<a href="/Ch04/index">index</a>
<h4>Param1 실습</h4>
<form action="/Ch04/annotation/param1" method="post">
<input type="text" name="uid"/>
<input type="submit" value="전송"/>
</form>
<h4>Param2 실습</h4>
<form action="/Ch04/annotation/param2" method="post">
<input type="text" name="uid"/>
<input type="text" name="name"/>
<input type="submit" value="전송"/>
</form>
<h4>Param3 실습</h4>
<form action="/Ch04/annotation/param3" method="post">
<input type="text" name="uid"/>
<input type="text" name="name"/>
<input type="text" name="hp"/>
<input type="number" name="age"/>
<input type="submit" value="전송"/>
</form>
</body>
</html><%@ page contentType="text/html; charset=UTF-8" pageEncoding="UTF-8"%>
<!DOCTYPE html>
<html>
<head>
<meta charset="UTF-8">
<title>annotation::model</title>
</head>
<body>
<h3>@ModelAttribute 어노테이션 실습</h3>
<a href="/Ch04/index">index</a>
<h4>model1 실습</h4>
<form action="/Ch04/annotation/model1" method="post">
<input type="text" name="uid"/>
<input type="submit" value="전송"/>
</form>
<h4>model2 실습</h4>
<form action="/Ch04/annotation/model2" method="post">
<input type="text" name="uid"/>
<input type="text" name="name"/>
<input type="submit" value="전송"/>
</form>
<h4>model3 실습</h4>
<form action="/Ch04/annotation/model3" method="post">
<input type="text" name="uid"/>
<input type="text" name="name"/>
<input type="text" name="hp"/>
<input type="number" name="age"/>
<input type="submit" value="전송"/>
</form>
</body>
</html>package ch04.controller;
import org.springframework.stereotype.Controller;
import org.springframework.ui.Model;
import org.springframework.web.bind.annotation.GetMapping;
import org.springframework.web.bind.annotation.ModelAttribute;
import org.springframework.web.bind.annotation.PostMapping;
import org.springframework.web.bind.annotation.RequestMapping;
import org.springframework.web.bind.annotation.RequestMethod;
import org.springframework.web.bind.annotation.RequestParam;
import ch04.dto.ModelDTO;
@Controller
public class AnnotationController {
@RequestMapping(value="/annotation/param", method=RequestMethod.GET)
public String param() {
return "/annotation/param";
}
@RequestMapping(value="/annotation/param1", method=RequestMethod.POST)
public String param1(@RequestParam("uid") String uid, Model model) {
System.out.println("uid : " + uid);
// 모델 참조를 통한 View 데잍터 출력
model.addAttribute("uid", uid);
return "/result/param";
}
@PostMapping("/annotation/param2")
public String param2(@RequestParam("uid") String uid, String name, Model model) {
System.out.println("uid : " + uid);
System.out.println("name : " + name);
model.addAttribute("uid", uid);
model.addAttribute("name", name);
return "/result/param";
}
@PostMapping("/annotation/param3")
public String param3(String uid, String name, String hp, int age, Model model) {
model.addAttribute("uid", uid);
model.addAttribute("name", name);
model.addAttribute("hp", hp);
model.addAttribute("age", age);
return "/result/param";
}
@GetMapping("/annotation/model")
public String model() {
return "/annotation/model";
}
@PostMapping("/annotation/model1")
public String model1(@ModelAttribute ModelDTO dto) {
return "/result/model";
}
@PostMapping("/annotation/model2")
public String model2(@ModelAttribute("user") ModelDTO dto) {
return "/result/model";
}
@PostMapping("/annotation/model3")
public String model3(ModelDTO dto) {
return "/result/model";
}
}<%@ page contentType="text/html; charset=UTF-8" pageEncoding="UTF-8"%>
<!DOCTYPE html>
<html>
<head>
<meta charset="UTF-8">
<title>annotation::param</title>
</head>
<body>
<h3>@RequestParam 어노테이션 결과</h3>
<a href="/Ch04/index">index</a>
<h4>param1 결과</h4>
<p>
uid : ${uid}
</p>
<h4>param2 결과</h4>
<p>
uid : ${uid}
name : ${name}
</p>
<h4>param3 결과</h4>
<p>
uid : ${uid}
name : ${name}
hp : ${hp}
age : ${age}
</p>
</body>
</html><%@ page contentType="text/html; charset=UTF-8" pageEncoding="UTF-8"%>
<!DOCTYPE html>
<html>
<head>
<meta charset="UTF-8">
<title>annotation::model</title>
</head>
<body>
<h3>@ModelAttribute 어노테이션 결과</h3>
<a href="/Ch04/index">index</a>
<h4>model1 결과</h4>
<p>
uid : ${modelDTO.uid}
</p>
<h4>model2 결과</h4>
<p>
uid : ${user.uid}
name : ${user.name}
</p>
<h4>model3 결과</h4>
<p>
uid : ${modelDTO.uid}
name : ${modelDTO.name}
hp : ${modelDTO.hp}
age : ${modelDTO.age}
</p>
</body>
</html>
☑ pom.xml
<project xmlns="http://maven.apache.org/POM/4.0.0" xmlns:xsi="http://www.w3.org/2001/XMLSchema-instance" xsi:schemaLocation="http://maven.apache.org/POM/4.0.0 https://maven.apache.org/xsd/maven-4.0.0.xsd">
    <modelVersion>4.0.0</modelVersion>
    <groupId>Ch04</groupId>
    <artifactId>Ch04</artifactId>
    <version>0.0.1-SNAPSHOT</version>
    <packaging>war</packaging>

    <dependencies>
    <!-- https://mvnrepository.com/artifact/org.springframework/spring-context -->
    <dependency>
        <groupId>org.springframework</groupId>
        <artifactId>spring-context</artifactId>
        <version>5.3.30</version>
    </dependency>

    <!-- https://mvnrepository.com/artifact/org.aspectj/aspectjweaver -->
    <dependency>
        <groupId>org.aspectj</groupId>
        <artifactId>aspectjweaver</artifactId>
        <version>1.9.20.1</version>
    </dependency>

    <!-- https://mvnrepository.com/artifact/org.springframework/spring-webmvc -->
    <dependency>
        <groupId>org.springframework</groupId>
        <artifactId>spring-webmvc</artifactId>
        <version>5.3.30</version>
    </dependency>

    <!-- https://mvnrepository.com/artifact/javax.servlet/jstl -->
    <dependency>
        <groupId>javax.servlet</groupId>
        <artifactId>jstl</artifactId>
        <version>1.2</version>
    </dependency>
    </dependencies>
    <build>
    <plugins>
      <plugin>
        <artifactId>maven-compiler-plugin</artifactId>
        <version>3.8.1</version>
        <configuration>
          <release>17</release>
        </configuration>
      </plugin>
      <plugin>
        <artifactId>maven-war-plugin</artifactId>
        <version>3.2.3</version>
      </plugin>
    </plugins>
    </build>
</project>
☑ web.xml
<?xml version="1.0" encoding="UTF-8"?>
<web-app xmlns:xsi="http://www.w3.org/2001/XMLSchema-instance" xmlns="http://xmlns.jcp.org/xml/ns/javaee" xsi:schemaLocation="http://xmlns.jcp.org/xml/ns/javaee http://xmlns.jcp.org/xml/ns/javaee/web-app_4_0.xsd" id="WebApp_ID" version="4.0">
  <display-name>Ch04</display-name>
  <welcome-file-list>
    <welcome-file>index.html</welcome-file>
    <welcome-file>index.jsp</welcome-file>
    <welcome-file>index.htm</welcome-file>
    <welcome-file>default.html</welcome-file>
    <welcome-file>default.jsp</welcome-file>
    <welcome-file>default.htm</welcome-file>
  </welcome-file-list>

  <listener>
      <listener-class>org.springframework.web.context.ContextLoaderListener</listener-class>
  </listener>

  <context-param>
      <param-name>contextConfigLocation</param-name>
      <param-value>classpath:application.xml</param-value>
  </context-param>

  <servlet>
      <servlet-name>app</servlet-name>
      <servlet-class>org.springframework.web.servlet.DispatcherServlet</servlet-class>
      <init-param>
          <param-name>contextConfigLocation</param-name>
          <param-value></param-value>
      </init-param>
      <load-on-startup>1</load-on-startup>
  </servlet>

  <servlet-mapping>
      <servlet-name>app</servlet-name>
      <url-pattern>/</url-pattern>
  </servlet-mapping>

  <!-- 인코딩 필터 등록 -->
	<filter>
		<filter-name>SetCharacterEncodingFilter</filter-name>
		<filter-class>org.apache.catalina.filters.SetCharacterEncodingFilter</filter-class>
		<init-param>
			<param-name>encoding</param-name>
			<param-value>UTF-8</param-value>
		</init-param>
	</filter>

	<filter-mapping>
		<filter-name>SetCharacterEncodingFilter</filter-name>
		<url-pattern>/*</url-pattern>
	</filter-mapping>
</web-app>
☑ application.xml
<?xml version="1.0" encoding="UTF-8"?>
<beans xmlns="http://www.springframework.org/schema/beans"
	xmlns:xsi="http://www.w3.org/2001/XMLSchema-instance"
	xmlns:context="http://www.springframework.org/schema/context"
	xmlns:aop="http://www.springframework.org/schema/aop"
	xmlns:mvc="http://www.springframework.org/schema/mvc"
	xsi:schemaLocation="http://www.springframework.org/schema/beans https://www.springframework.org/schema/beans/spring-beans.xsd
		http://www.springframework.org/schema/context https://www.springframework.org/schema/context/spring-context.xsd
		http://www.springframework.org/schema/aop https://www.springframework.org/schema/aop/spring-aop.xsd
		http://www.springframework.org/schema/mvc https://www.springframework.org/schema/mvc/spring-mvc.xsd">

	<context:component-scan base-package="ch04"/>

	<!-- Annotation 기반 AOP 처리를 위한 Auto proxy 설정 -->
	<aop:aspectj-autoproxy></aop:aspectj-autoproxy>

	<!-- Spring MVC Annotation 처리를 위한 설정 -->
	<mvc:annotation-driven></mvc:annotation-driven>

	<!-- Spring MVC ViewResolver 설정 -->
	<bean id="viewResolver" class="org.springframework.web.servlet.view.InternalResourceViewResolver">
	    <property name="viewClass" value="org.springframework.web.servlet.view.JstlView"/>
	    <property name="prefix" value="/WEB-INF/views/"/>
	    <property name="suffix" value=".jsp"/>
	</bean>

</beans>